Difference between revisions of "New Themes in JReviews 2.3"
(→Other important changes in the new default theme) |
|||
| (13 intermediate revisions by 2 users not shown) | |||
| Line 9: | Line 9: | ||
* Performance improvements | * Performance improvements | ||
* Design and layout improvements | * Design and layout improvements | ||
| + | * Simplification of GeoMaps integration and setup | ||
| − | Like in the earlier versions if JReviews, '''Default Theme''' is the main | + | Like in the earlier versions if JReviews, '''Default Theme''' is the main theme which contains all required files, while '''Compact Theme''' and '''Dark Theme''' contain only modified files which override original files in the Default Theme. |
| − | + | ||
| − | + | ||
| − | + | ||
== Creating Custom Themes == | == Creating Custom Themes == | ||
| − | It is very important ( | + | It is very important (for easier future upgrades) that you don't make modifications to the default themes, instead create your own theme folder and put your customized files there. |
You should use [[JReviews Code Overrides]] and create the custom theme folder there. | You should use [[JReviews Code Overrides]] and create the custom theme folder there. | ||
| − | A good example on how to create your own theme are the Compact and Dark themes. Both themes have a lot of changes, but they contain only several files. | + | A good example on how to create your own theme are the Compact and Dark themes. Both themes have a lot of changes, but they contain only several files. Once you add your new theme in the /templates/jreviews_overrides/views/themes folder you also need to add and update the themeInfo.xml file. |
| − | + | <source lang="xml"> | |
| + | <?xml version="1.0" encoding="utf-8"?> | ||
| + | <theme> | ||
| + | <creationDate>March 2011</creationDate> | ||
| + | <author>ClickFWD</author> | ||
| + | <authorEmail>support@reviewsforjoomla.com</authorEmail> | ||
| + | <authorUrl>http://www.reviewsforjoomla.com</authorUrl> | ||
| + | <copyright>Copyright (C) 2010-2011 ClickFWD LLC. All rights reserved.</copyright> | ||
| + | <license>Proprietary</license> | ||
| + | <version>2.3</version> | ||
| + | <description>Your description.</description> | ||
| + | <settings> | ||
| + | <name>compactcustom</name> | ||
| + | <title>Compact Custom Theme</title> | ||
| + | <addon>0</addon> | ||
| + | <configuration>1</configuration> | ||
| + | <fallback>0</fallback> | ||
| + | </settings> | ||
| + | </theme> | ||
| + | </source> | ||
| − | + | It is important that you use a new folder name for your custom theme and then update the xml file to reflect this folder name in the <name> attribute. In the example above we used "compactcustom". Do not use the existing "default", "compact" or "dark" names for new themes. Unless you are writing a complete 100% new theme from scratch that includes all theme files, the fallback attribute should always be set to no because only the default theme which contains all files should be used as fallback. | |
| + | |||
| + | It is no longer necessary to customize core css files, you can put all your css modifications into the new <span style="color: blue">custom_styles.css</span> file. The styles you add there will override the core styles. A great benefit of this solution is that you will not need to worry about changes in core css files when you upgrade JReviews. | ||
| + | |||
| + | To add your custom styles for JReviews pages, use <span style="color: blue">custom_styles.css</span>. This is the only css file you should have in your custom theme! | ||
=== Examples === | === Examples === | ||
| − | If | + | If you want the modify certain css style that exists in core theme.css, first copy that style into custom_styles.css and then make the modifications. |
| − | If you want to change the rating stars, | + | If you want to change the rating stars, you only need to define a different background image in your custom_styles.css. There are several sprite images for rating stars available: |
[[File:RatingStars.jpg]] | [[File:RatingStars.jpg]] | ||
| − | By default, rating_stars.png is used. If you want to use different stars, | + | By default, rating_stars.png is used. If you want to use different stars, take a look at the instructions in this article: |
| − | + | [[How to change the rating star images]] | |
| − | + | ||
| − | + | ||
| − | + | ||
| − | + | ||
| − | + | ||
| − | + | ||
| − | |||
| − | |||
| − | |||
| − | |||
| − | |||
| + | == Other important changes in the new default theme == | ||
| − | + | The theme file of the listing detail page (detail.thtml) contains much less code than before and it's easier to add tabs and other modifications. | |
| + | In fact, we included the <span style="color: blue">detail_tabs.thtml</span> (which contains some predefined tabs) into default theme, and the only thing you need to do to have the tabs is to enter "_tabs" theme suffix in the [[Category Layout Manager]] for categories where you want this file to be used. | ||
| + | |||
| + | === Simplified GeoMaps integration === | ||
| + | |||
| + | It is not necessary to switch to the geomaps theme which is no longer available as an option. Instead you enable or disable maps in the Listing Types Manager for each listing type. If you are upgrading an existing JReviews installation, make sure you edit each listing type and save it again for the new settings to take effect. | ||
| + | |||
| + | === New layouts for Listings Module === | ||
| + | |||
| + | *Vertical list layout (useful for sidebar lists of listings): | ||
| + | |||
| + | [[File:Listings_vertical.png]] | ||
| + | |||
| + | To use this layout, enter "_vertical" as the Theme Suffix in the Listings Module parameters | ||
| + | |||
| + | |||
| + | *Slideshow layout: | ||
| + | |||
| + | [[File:Listings_slideshow.jpg]] | ||
| + | |||
| + | To use this layout, enter "_slideshow" as the Theme Suffix in the Listings Module parameters. | ||
| + | |||
| + | |||
| + | === Layouts in Compact Theme === | ||
| + | |||
| + | If you select '''Compact Theme''' in JReviews configuration, the layouts for Listing Detail Page, Blogview and Tableview will be different than default: | ||
| + | |||
| + | |||
| + | *Listing detail page: | ||
| + | |||
| + | [[File:DetailPage_compact.jpg]] | ||
| + | |||
| + | |||
| + | *Blogview list page: | ||
| + | |||
| + | [[File:Blogview_compact.jpg]] | ||
| + | |||
| + | |||
| + | |||
| + | *Tableview list page: | ||
| + | |||
| + | [[File:Tableview_compact.jpg]] | ||
| + | |||
| + | |||
| − | |||
| − | |||
| − | |||
Latest revision as of 18:53, 28 June 2019
JReviews 2.3 comes with 3 new themes which replaced the old ones:
- Default Theme
- Compact Theme
- Dark Theme
Some of the main theme improvements:
- Easier to customize
- Performance improvements
- Design and layout improvements
- Simplification of GeoMaps integration and setup
Like in the earlier versions if JReviews, Default Theme is the main theme which contains all required files, while Compact Theme and Dark Theme contain only modified files which override original files in the Default Theme.
Contents
Creating Custom Themes
It is very important (for easier future upgrades) that you don't make modifications to the default themes, instead create your own theme folder and put your customized files there.
You should use JReviews Code Overrides and create the custom theme folder there.
A good example on how to create your own theme are the Compact and Dark themes. Both themes have a lot of changes, but they contain only several files. Once you add your new theme in the /templates/jreviews_overrides/views/themes folder you also need to add and update the themeInfo.xml file.
<?xml version="1.0" encoding="utf-8"?>
<theme>
    <creationDate>March 2011</creationDate>
    <author>ClickFWD</author>
    <authorEmail>[email protected]</authorEmail>
    <authorUrl>http://www.reviewsforjoomla.com</authorUrl>
    <copyright>Copyright (C) 2010-2011 ClickFWD LLC. All rights reserved.</copyright>
    <license>Proprietary</license>
    <version>2.3</version>
    <description>Your description.</description>
    <settings>
        <name>compactcustom</name>
        <title>Compact Custom Theme</title>
        <addon>0</addon>
        <configuration>1</configuration>
        <fallback>0</fallback>
    </settings>
</theme>
It is important that you use a new folder name for your custom theme and then update the xml file to reflect this folder name in the <name> attribute. In the example above we used "compactcustom". Do not use the existing "default", "compact" or "dark" names for new themes. Unless you are writing a complete 100% new theme from scratch that includes all theme files, the fallback attribute should always be set to no because only the default theme which contains all files should be used as fallback.
It is no longer necessary to customize core css files, you can put all your css modifications into the new custom_styles.css file. The styles you add there will override the core styles. A great benefit of this solution is that you will not need to worry about changes in core css files when you upgrade JReviews.
To add your custom styles for JReviews pages, use custom_styles.css. This is the only css file you should have in your custom theme!
Examples
If you want the modify certain css style that exists in core theme.css, first copy that style into custom_styles.css and then make the modifications.
If you want to change the rating stars, you only need to define a different background image in your custom_styles.css. There are several sprite images for rating stars available:
By default, rating_stars.png is used. If you want to use different stars, take a look at the instructions in this article:
How to change the rating star images
Other important changes in the new default theme
The theme file of the listing detail page (detail.thtml) contains much less code than before and it's easier to add tabs and other modifications.
In fact, we included the detail_tabs.thtml (which contains some predefined tabs) into default theme, and the only thing you need to do to have the tabs is to enter "_tabs" theme suffix in the Category Layout Manager for categories where you want this file to be used.
Simplified GeoMaps integration
It is not necessary to switch to the geomaps theme which is no longer available as an option. Instead you enable or disable maps in the Listing Types Manager for each listing type. If you are upgrading an existing JReviews installation, make sure you edit each listing type and save it again for the new settings to take effect.
New layouts for Listings Module
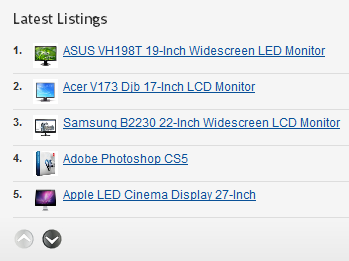
- Vertical list layout (useful for sidebar lists of listings):
To use this layout, enter "_vertical" as the Theme Suffix in the Listings Module parameters
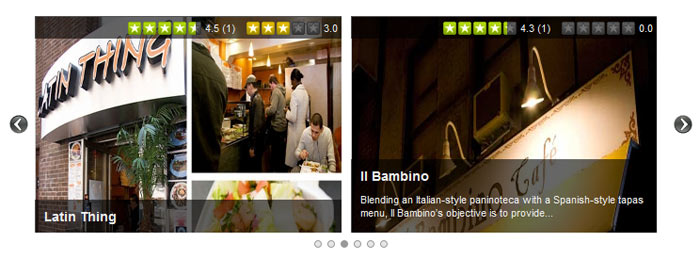
- Slideshow layout:
To use this layout, enter "_slideshow" as the Theme Suffix in the Listings Module parameters.
Layouts in Compact Theme
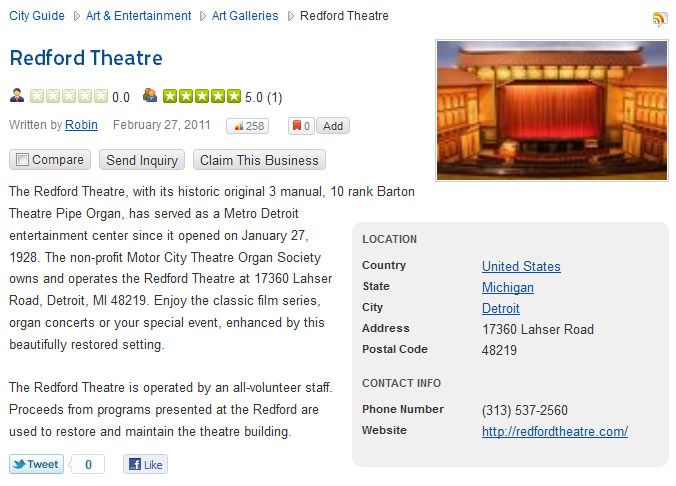
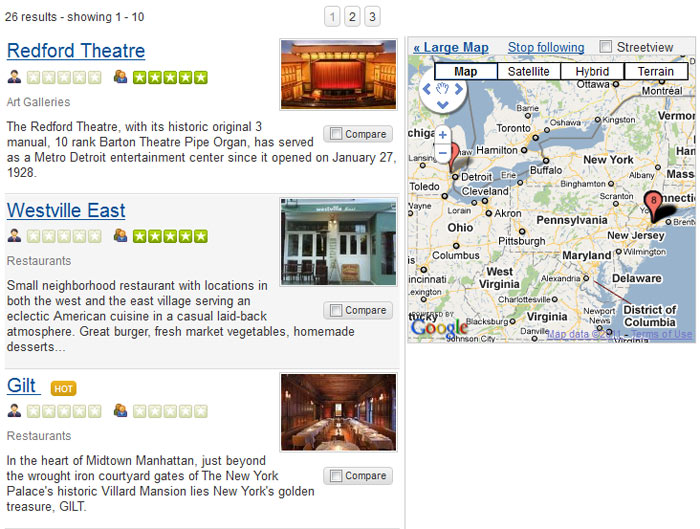
If you select Compact Theme in JReviews configuration, the layouts for Listing Detail Page, Blogview and Tableview will be different than default:
- Listing detail page:
- Blogview list page:
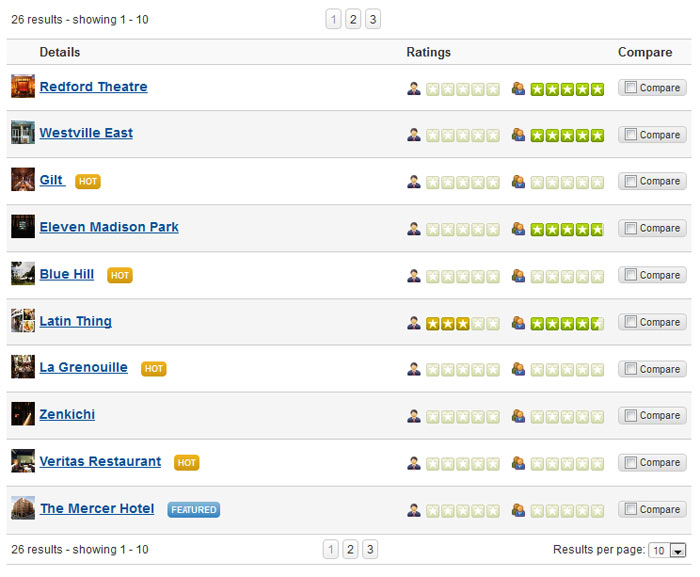
- Tableview list page:

