Difference between revisions of "Setup Twitter integration"
| (10 intermediate revisions by 2 users not shown) | |||
| Line 1: | Line 1: | ||
| − | + | <div class="successbox" style="width: 95%"> | |
| + | [https://www.jreviews.com/docs/social-sharing There's a new version of this article] | ||
| − | + | </div> | |
| + | __TOC__ | ||
| − | + | The JReviews integration with Twitter allows you to create incremental traffic to your site by posting updates to *your* Twitter account based on user submitted actions. | |
| + | ==Which actions will generated a Twitter update?== | ||
Currently the actions supported by this integration are submissions of new listings, reviews and review comments. | Currently the actions supported by this integration are submissions of new listings, reviews and review comments. | ||
| Line 12: | Line 15: | ||
With any of the above actions there will be a Twitter update to your account linking back to the related page on your site. For moderated submissions the updates will be posted on moderator approval. | With any of the above actions there will be a Twitter update to your account linking back to the related page on your site. For moderated submissions the updates will be posted on moderator approval. | ||
| − | ==How to setup the Twitter Integration | + | ==How to setup the Twitter Integration == |
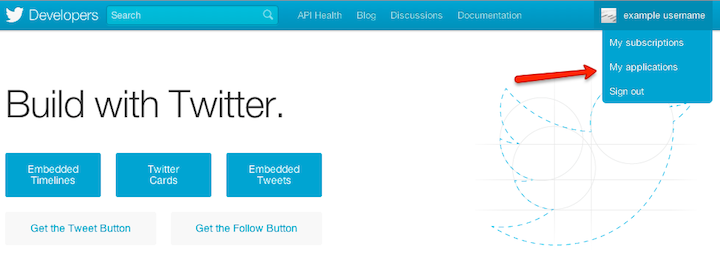
| − | First you need to create a Twitter app. Go to | + | First you need to create a Twitter app. Go to https://apps.twitter.com and log in. Under your username click on "My Applications" link: |
[[File:Twitter1.png]] | [[File:Twitter1.png]] | ||
| − | |||
On the next page click the '''Create a new application''' button: | On the next page click the '''Create a new application''' button: | ||
[[File:Twitter2.png]] | [[File:Twitter2.png]] | ||
| − | |||
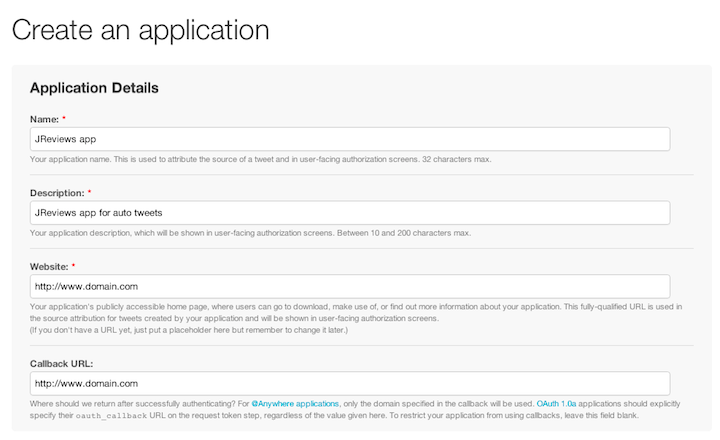
Then fill in your app details: | Then fill in your app details: | ||
| Line 28: | Line 29: | ||
[[File:Twitter3.png]] | [[File:Twitter3.png]] | ||
| − | On this page you'll need to accept "Developer Rules" | + | On this page you'll need to accept "Developer Rules", fill in captcha and click the '''Create your Twitter application''' button at the bottom. |
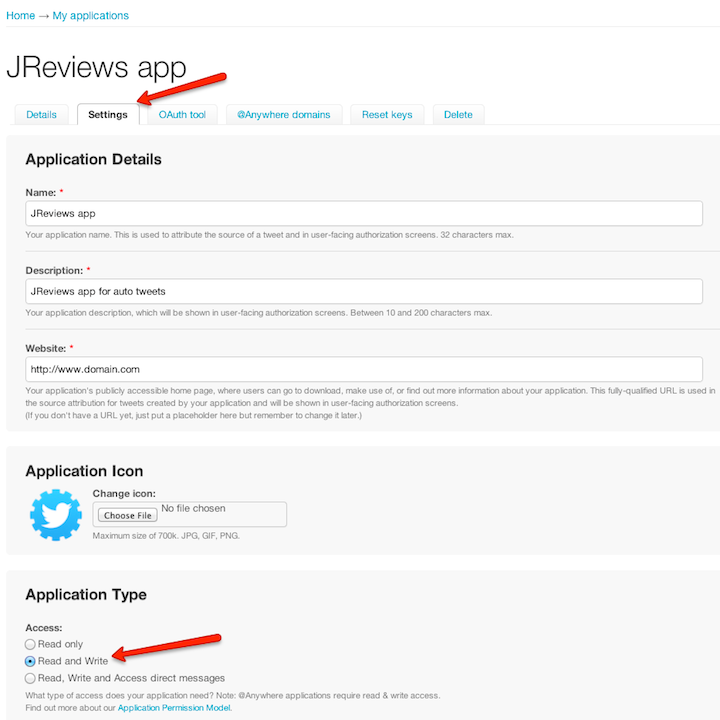
| + | On the next page click on the '''Settings''' tab and choose '''Read & Write''' for app access: | ||
| + | [[File:Twitter4.png]] | ||
| − | + | At the bottom of the page click '''Update this Twitter's application setting''' button and then return to the first tab. | |
| − | + | On the first tab click '''Create my access token''' button and reload the page. | |
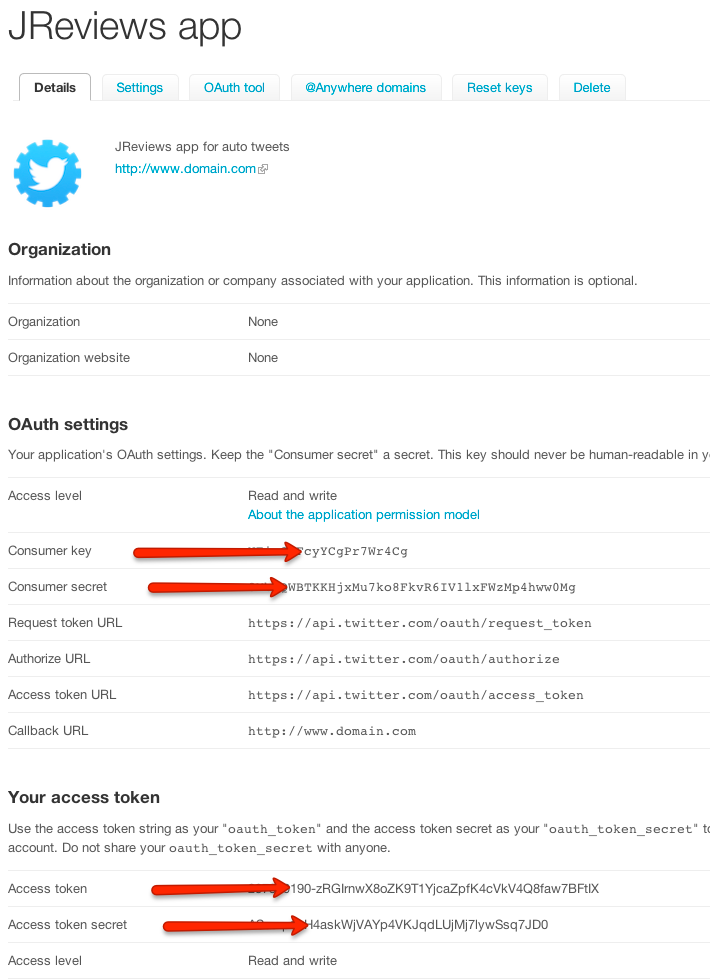
| + | Now you have all required app information that you need to enter in JReviews Configuration settings: | ||
| − | + | *Consumer Key | |
| + | *Consumer Secret | ||
| + | *Access Token | ||
| + | *Access Token Secret | ||
| − | + | [[File:Twitter5.png]] | |
| + | == Integrating bit.ly == | ||
| − | + | For the automatic tweets to include links to the listings on your site, you also need a bit.ly account. Make sure to create a real account instead of using your Twitter account to access bit.ly. | |
| − | + | In JReviews Configuration you will need to enter your bit.ly username and API Key. | |
| + | To find the API Key, in your bit.ly account click on the '''Settings''' link, go to the '''Advanced''' tab and click the '''Show legacy API key''' link: | ||
| + | |||
| + | [[File:Bitly.png]] | ||
== Troubleshooting == | == Troubleshooting == | ||
| Line 55: | Line 66: | ||
3) Make sure your server time settings are correct. If the server time settings are different than those of Twitter then the Oauth athentication will result in a 401 error. More details about this problem can be read here https://github.com/abraham/twitteroauth/issues/44 | 3) Make sure your server time settings are correct. If the server time settings are different than those of Twitter then the Oauth athentication will result in a 401 error. More details about this problem can be read here https://github.com/abraham/twitteroauth/issues/44 | ||
| + | |||
| + | |||
| + | |||
| + | [[Category:JReviews]] | ||
| + | [[Category:Community]] | ||
| + | [[Category:Twitter]] | ||
Latest revision as of 20:13, 5 May 2020
Contents
The JReviews integration with Twitter allows you to create incremental traffic to your site by posting updates to *your* Twitter account based on user submitted actions.
Which actions will generated a Twitter update?
Currently the actions supported by this integration are submissions of new listings, reviews and review comments.
With any of the above actions there will be a Twitter update to your account linking back to the related page on your site. For moderated submissions the updates will be posted on moderator approval.
How to setup the Twitter Integration
First you need to create a Twitter app. Go to https://apps.twitter.com and log in. Under your username click on "My Applications" link:
On the next page click the Create a new application button:
Then fill in your app details:
On this page you'll need to accept "Developer Rules", fill in captcha and click the Create your Twitter application button at the bottom.
On the next page click on the Settings tab and choose Read & Write for app access:
At the bottom of the page click Update this Twitter's application setting button and then return to the first tab.
On the first tab click Create my access token button and reload the page.
Now you have all required app information that you need to enter in JReviews Configuration settings:
- Consumer Key
- Consumer Secret
- Access Token
- Access Token Secret
Integrating bit.ly
For the automatic tweets to include links to the listings on your site, you also need a bit.ly account. Make sure to create a real account instead of using your Twitter account to access bit.ly.
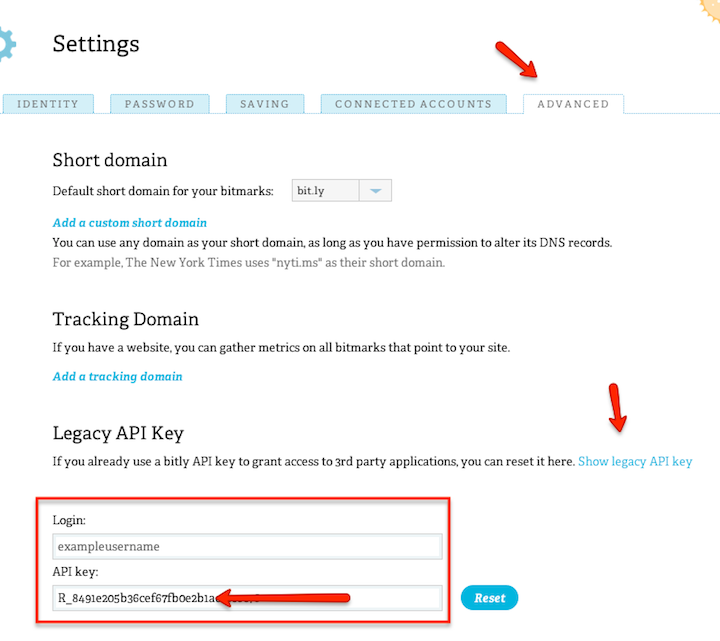
In JReviews Configuration you will need to enter your bit.ly username and API Key. To find the API Key, in your bit.ly account click on the Settings link, go to the Advanced tab and click the Show legacy API key link:
Troubleshooting
If the twitter integration is not working, these are the first things you need to check:
1) Make sure your Twitter App has Read & Write access.
2) Make sure you entered the callback url as shown above.
3) Make sure your server time settings are correct. If the server time settings are different than those of Twitter then the Oauth athentication will result in a 401 error. More details about this problem can be read here https://github.com/abraham/twitteroauth/issues/44
