Difference between revisions of "Setup Facebook integration"
(→How to setup the Facebook Integration) |
|||
| (6 intermediate revisions by 2 users not shown) | |||
| Line 1: | Line 1: | ||
| + | '''Facebook is deprecating posting to a user's profile on August 1, 2018 so this feature will be removed from JReviews. You should still create a Facebook App, or use an existing one for your site, for improved Open Graph, FB sharing and FB re-scraping functionality.''' | ||
| + | |||
__TOC__ | __TOC__ | ||
| Line 31: | Line 33: | ||
In the JReviews configuration, under the Community tab you need to enter a Facebook '''Application ID''' and '''Secret''' strings. If you already have a Facebook application for your site login, then you can use the strings from that application, otherwise you need to go to https://developers.facebook.com/apps and create a new application. | In the JReviews configuration, under the Community tab you need to enter a Facebook '''Application ID''' and '''Secret''' strings. If you already have a Facebook application for your site login, then you can use the strings from that application, otherwise you need to go to https://developers.facebook.com/apps and create a new application. | ||
| − | Once you click the '''Create New App''' button, you' | + | Once you click the '''Create New App''' button, you will get a "Select a platform to get started" popup with the choice of platform. Instead of choosing a platform, click the '''basic setup''' link in ''If you're developing on another platform or want to skip this step for now, use the basic setup.'' at the bottom of the popup. Next you will get a second popup where you need to enter the name of the App. It is recommended to use the name of your site as the app ''Display Name'': |
[[File:jreviews-fb-new-app.png]] | [[File:jreviews-fb-new-app.png]] | ||
| − | + | Select a ''Category'' that your site belongs to and click '''Create App ID'''. | |
| + | |||
| + | Next you will get Facebook's security check. After you pass the security check, you will be redirected to the app dashboard page. | ||
| + | |||
| + | First click on the '''Settings''' link in the sidebar menu. Enter your email in the '''Contact Email''' setting and click '''Save Changes'''. Next, click '''+ Add Platform''' button: | ||
[[File:jreviews-fb-app-setup.png]] | [[File:jreviews-fb-app-setup.png]] | ||
| − | + | Choose '''Website''' on the Add Platform popup. In the '''Site URL''' setting enter your website url and click '''Save Changes'''. | |
| + | |||
| + | [[File:jreviews-fb-app-setup2.png]] | ||
| + | |||
| + | On top of the Settings page you will find '''App ID''' and '''App Secret''' values (click '''Show''' button next to the App Secret to reveal it). Paste those values in the configuration screen in JReviews Configuration, Community tab: | ||
[[File:jreviews-fb-settings.png]] | [[File:jreviews-fb-settings.png]] | ||
| − | Finally, Facebook requires that you submit the publish_actions permission for approval within the Facebook App. This can be found in the " | + | Finally, Facebook requires that you submit the publish_actions permission for approval within the Facebook App. This can be found in the "App Review" page. As the administrator of the App you can test the process without the approval, but in order to roll out the feature to your users, the approval is necessary. You need to provide Facebook with the exact steps to make a submission on your site so they can test it. We recommend you use screenshots and share the links with Facebook either via Dropbox or any other method you know to share files via links. |
[[File:Jreviews-fb-publish-actions.png]] | [[File:Jreviews-fb-publish-actions.png]] | ||
Latest revision as of 14:59, 2 June 2018
Facebook is deprecating posting to a user's profile on August 1, 2018 so this feature will be removed from JReviews. You should still create a Facebook App, or use an existing one for your site, for improved Open Graph, FB sharing and FB re-scraping functionality.
Contents
The JReviews integration with Facebook allows you to create incremental traffic to your site, by posting user submitted actions to their Facebook walls. These will also appear in the newsfeeds of the user's friends which creates a viral effect.
Which actions will generate a Wall post?
Currently the actions supported by this integration are submissions of unmoderated listings, reviews and helpful review votes, which are similar to the "like it" functionality of Facebook, but for user reviews in JReviews.
With any of the above actions, the listing or review information will appear in the user's Facebook wall, including a link back to the detail page, the listing image if available, and the user rating where appropriate. This is how a review submission will look like in the reviewer's wall:
Helpful review voting will only generate a wall post if the user has already established a Facebook session; unlike reviews and listings, there's no practical way to ask the user to publish the vote to FB. If users log into your site via Facebook connect, then positive votes will automatically generate a wall post with the review the user liked.
Are there any special requirements
The integration will work with or without a Facebook Connect Joomla login. If your site already supports Facebook Connect login, via JomSocial, Community Builder or any other solution, then JReviews is able to identify the Facebook session for the current user and use it to submit directly to his Wall. This is transparent to the user.
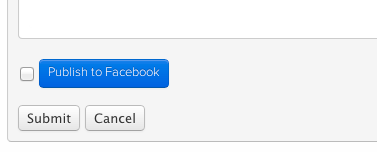
If the user has not granted publish stream permissions or if the user is not logged in via Facebook, then he will see the following checkbox option above the submit button in both review and listing forms:
When the user clicks on the checkbox or FB button the Facebook Popup will appear requesting login information or publish stream permissions or both. This button will only appear for users not logged in via Facebook or users that haven't granted publish permissions. If you decide you want to allow users to opt-out of publishing the submissions to their Facebook wall, you can enable the opt-out setting in the JReviews configuration for Facebook.
Facebook API Compatibility Notice
JReviews uses only the latest FB javascript and PHP APIs and will not work with websites that use the old API for Facebook Connect functionality. You can find references to the old JavaScript SDK by searching for the string "FeatureLoader.js.php in your page source.
How to setup the Facebook Integration
In the JReviews configuration, under the Community tab you need to enter a Facebook Application ID and Secret strings. If you already have a Facebook application for your site login, then you can use the strings from that application, otherwise you need to go to https://developers.facebook.com/apps and create a new application.
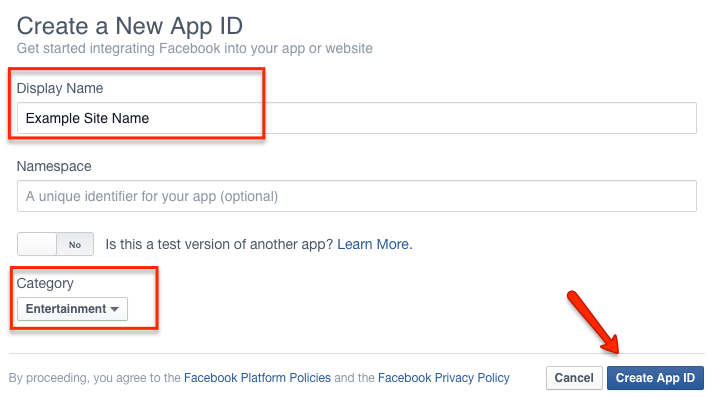
Once you click the Create New App button, you will get a "Select a platform to get started" popup with the choice of platform. Instead of choosing a platform, click the basic setup link in If you're developing on another platform or want to skip this step for now, use the basic setup. at the bottom of the popup. Next you will get a second popup where you need to enter the name of the App. It is recommended to use the name of your site as the app Display Name:
Select a Category that your site belongs to and click Create App ID.
Next you will get Facebook's security check. After you pass the security check, you will be redirected to the app dashboard page.
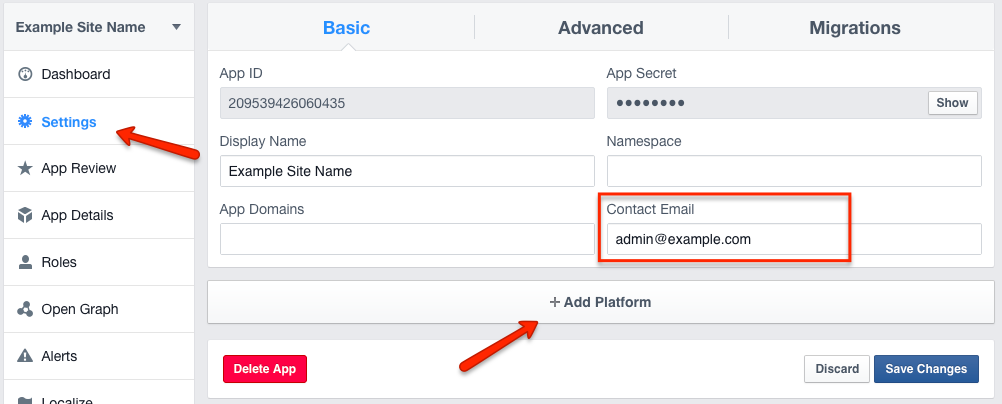
First click on the Settings link in the sidebar menu. Enter your email in the Contact Email setting and click Save Changes. Next, click + Add Platform button:
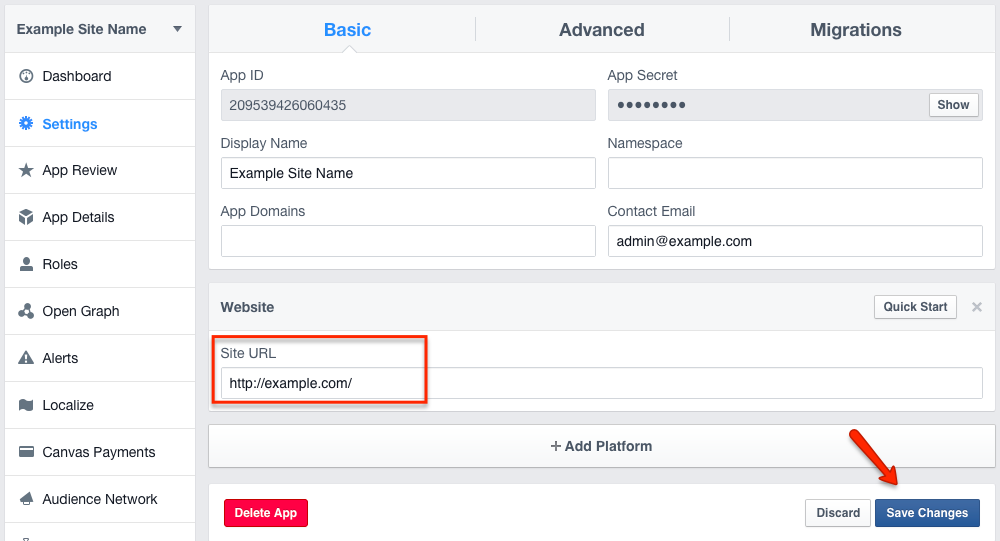
Choose Website on the Add Platform popup. In the Site URL setting enter your website url and click Save Changes.
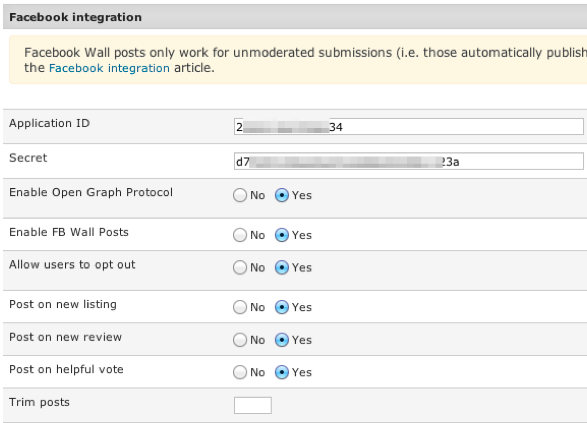
On top of the Settings page you will find App ID and App Secret values (click Show button next to the App Secret to reveal it). Paste those values in the configuration screen in JReviews Configuration, Community tab:
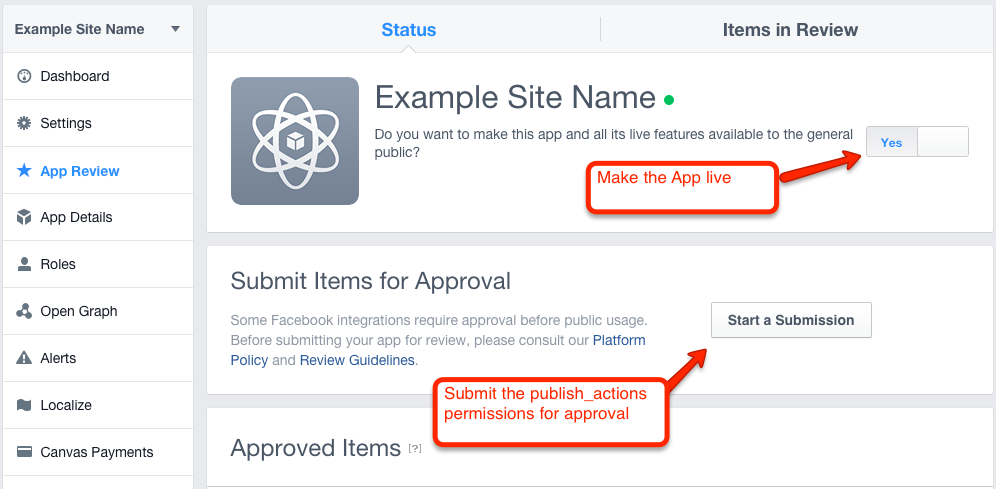
Finally, Facebook requires that you submit the publish_actions permission for approval within the Facebook App. This can be found in the "App Review" page. As the administrator of the App you can test the process without the approval, but in order to roll out the feature to your users, the approval is necessary. You need to provide Facebook with the exact steps to make a submission on your site so they can test it. We recommend you use screenshots and share the links with Facebook either via Dropbox or any other method you know to share files via links.
Troubleshooting
Testing the integration
To test whether the integration is working, make sure you don't have an active Facebook session when using Facebook Connect to log in to your site. Go to the Facebook site and log out. Then go back to your site and navigate to a page where you can see the review form. Click on add review and look for the Publish to Facebook button as shown in the second image from the top. If it's not there, make sure you are accessing the site as a user for which moderation is not enabled because this only works without moderation.
A few steps to go over if it doesn't work
- If you have another Facebook Connect extension used for user login, make sure it uses the most recent javascript SDK (API). Instructions for checking this are above
- Make sure you used the Facebook Application ID in the configuration instead of the API Key. Components like JomSocial use the API Key; therefore just copying your settings will not work.
- Make sure you disabled the moderation for listings and/or reviews for the user group for which you are testing this feature. The FB integration only works with unmoderated submissions.

