Difference between revisions of "How to create Google Maps API keys"
(Created page with "Google recently started requiring API keys for displaying the maps on your website. To create the API keys, go to the [https://console.developers.google.com].") |
|||
| (18 intermediate revisions by 2 users not shown) | |||
| Line 1: | Line 1: | ||
| − | Google recently started requiring API keys for displaying the maps on your website. To create the API keys, go to the [https://console.developers.google.com]. | + | __TOC__ |
| + | |||
| + | == Why do I need an API key? == | ||
| + | |||
| + | Google recently started requiring API keys for displaying the maps on your website and using some of its map-related services. To create the API keys, go to the [https://console.developers.google.com https://console.developers.google.com]. You'll need a browser key, which is public and shown in the source of the browser; and a private key, which is private and it's used only on server-side requests. | ||
| + | |||
| + | When you open the Google API Console for the first time, google will ask you to create a new project. If you plan to have multiple websites, it is recommended to create separate projects for them, so that each website has its own API keys: | ||
| + | |||
| + | [[File:Google-apis-project.png]] | ||
| + | |||
| + | == Creating the server key == | ||
| + | |||
| + | Once you create the first project and select it, click the '''Credentials''' link in the sidebar, then click the '''Create Credentials''' button and in the dropdown choose '''API Key''': | ||
| + | |||
| + | [[File:Google-apis-credentials.png]] | ||
| + | |||
| + | You will get the key in a popup: | ||
| + | |||
| + | [[File:Google-apis-server-key.png]] | ||
| + | |||
| + | Click '''Close''' and then click on the key to edit its name and optionally restrict it: | ||
| + | |||
| + | [[File:Google-apis-server-key2.png]] | ||
| + | |||
| + | Next change the name of the key and optionally the IP address of your server, then click the '''Save''' button. It is recommended to leave Key restriction disabled initially and add it later once you confirm that the key works. The Server key is used to Geocode addresses in the GeoMaps add-on administration. | ||
| + | |||
| + | == Creating the browser key == | ||
| + | |||
| + | Click the '''Create Credentials''' button and in the dropdown choose '''API Key'''. You will get a new key in a popup. Click the '''Close''' button then click on the key to edit its name and optionally restrict it: | ||
| + | |||
| + | [[File:Google-apis-browser-key.png]] | ||
| + | |||
| + | Even though Google suggest using '''*.example.com/*''' format, it is better to only enter the domain name. The Browser key is used on the frontend of your site to display the maps. If you have any problems, try using the key without restriction and after you confirm that the maps work, add the domain restriction. | ||
| + | |||
| + | == Enabling the APIs == | ||
| + | |||
| + | To use all available features of the GeoMaps add-on, you will need to enable these APIs: | ||
| + | |||
| + | * '''Google Maps JavaScript API''' | ||
| + | * '''Google Static Maps API''' | ||
| + | * '''Google Maps Geocoding API''' | ||
| + | * '''Google Maps Geolocation API''' | ||
| + | * '''Google Places API ''' | ||
| + | * '''Google Maps Directions API''' | ||
| + | |||
| + | Click the '''Library''' link in the sidebar and click on one of the APIs: | ||
| + | |||
| + | [[File:Google-apis-enable-maps.png]] | ||
| + | |||
| + | On the next screen, click the '''Enable''' button: | ||
| + | |||
| + | [[File:Google-apis-enable-maps2.png]] | ||
| + | |||
| + | Go back to the Library and repeat the same steps to enable the other required APIs. | ||
| + | |||
| + | == Adding API Keys to the GeoMaps add-on configuration == | ||
| + | |||
| + | For the GeoMaps add-on to use the APIs, enter the API keys you created into the GeoMaps Configuration: | ||
| + | |||
| + | [[File:Google-apis-geomaps-config.png]] | ||
| + | |||
| + | Save the configuration and click the '''Clear Cache & File Registry''' link in JReviews sidebar. The maps should now work on the frontend of the site if you fully configured the GeoMaps add-on. | ||
| + | |||
| + | ==Creating a billing account for your API project== | ||
| + | |||
| + | In July of 2018 Google changed the pricing model for it's Google Maps service. This means that unless you create a billing account and associate it with your Google Cloud Console project, maps, and all other GeoMaps related features that depend on Google API services (geolocation, directions, and streetview) will stop working. | ||
| + | |||
| + | Google is giving you a $200 credit per month. After that they will charge incrementally based on their new pricing structure. You can also set a maximum daily spend limit. | ||
| + | |||
| + | '''What do you need to do?''' | ||
| + | |||
| + | * Go to the [https://console.cloud.google.com/billing Google Cloud Console Billing] page and create a new billing account for your project if you don't already have one. | ||
| + | * Go to the [https://console.cloud.google.com/home Google Cloud Console Dashboard] and select the project you use with your JReviews site from the top bar. Make sure this project has all the necessary APIs enabled for GeoMaps | ||
| + | * Once inside your project, click the hamburger menu icon on the top-left and select Billing to associate your project with the billing account you created in step 1. | ||
| + | * Check your email to find a verification/confirmation email from Google to finalize the process. | ||
| + | |||
| + | You may need to wait a few minutes for the changes to go live. | ||
| + | |||
| + | In an effort to help you offset the potential costs associated with Google's pricing change, a new feature was developed for GeoMaps to disable the rendering of maps until a button is clicked by the site visitor. You can read more about it in the [https://forum.jreviews.com/topic/30663-new-geomaps-feature-to-limit-google-maps-api-requests/ announcement post in the forum]. For clients with very high usage, a brand new [https://www.jreviews.com/addons/mapspro MapsPro Add-on] was also developed which allows you to choose from several free and paid maps and geocoding providers. To purchase MapsPro you need to be on the Standard, Professional or Developer plans. | ||
| + | |||
| + | |||
| + | [[Category:JReviews]] | ||
| + | [[Category:GeoMaps Addon]] | ||
Latest revision as of 12:41, 24 September 2019
Contents
Why do I need an API key?
Google recently started requiring API keys for displaying the maps on your website and using some of its map-related services. To create the API keys, go to the https://console.developers.google.com. You'll need a browser key, which is public and shown in the source of the browser; and a private key, which is private and it's used only on server-side requests.
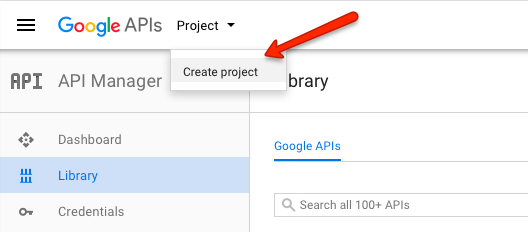
When you open the Google API Console for the first time, google will ask you to create a new project. If you plan to have multiple websites, it is recommended to create separate projects for them, so that each website has its own API keys:
Creating the server key
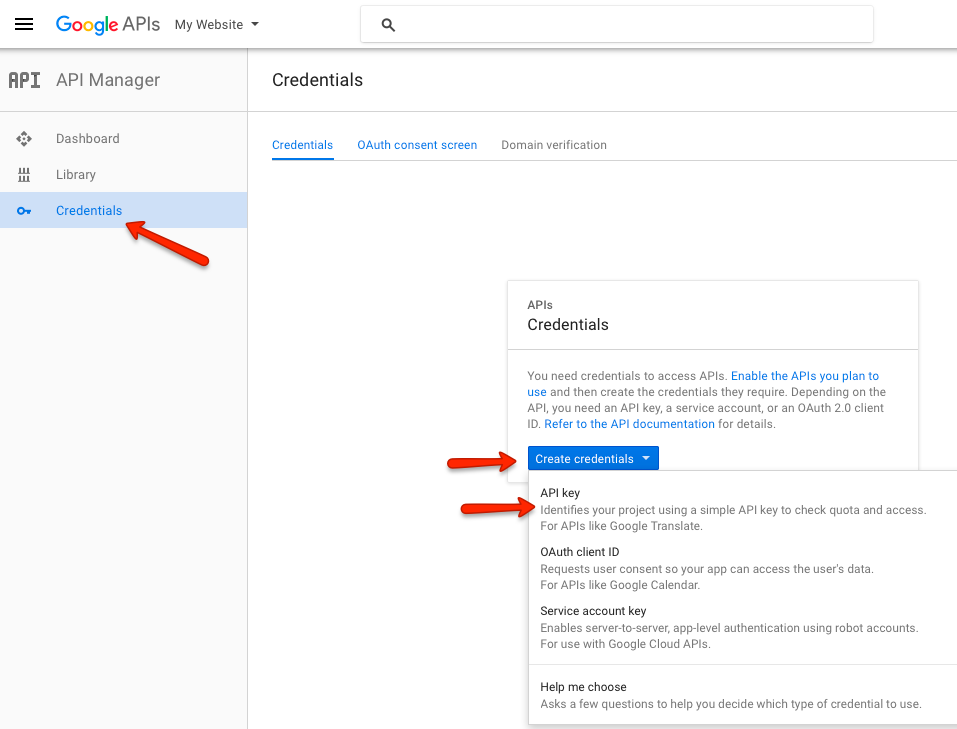
Once you create the first project and select it, click the Credentials link in the sidebar, then click the Create Credentials button and in the dropdown choose API Key:
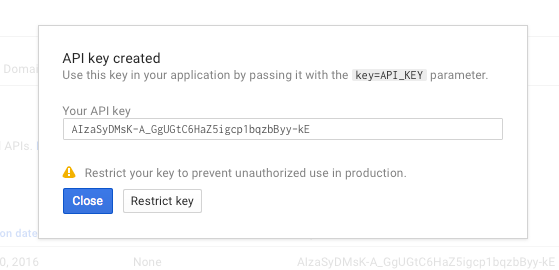
You will get the key in a popup:
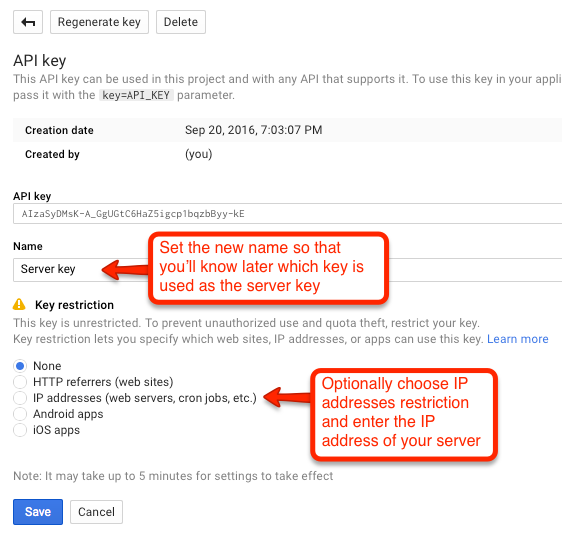
Click Close and then click on the key to edit its name and optionally restrict it:
Next change the name of the key and optionally the IP address of your server, then click the Save button. It is recommended to leave Key restriction disabled initially and add it later once you confirm that the key works. The Server key is used to Geocode addresses in the GeoMaps add-on administration.
Creating the browser key
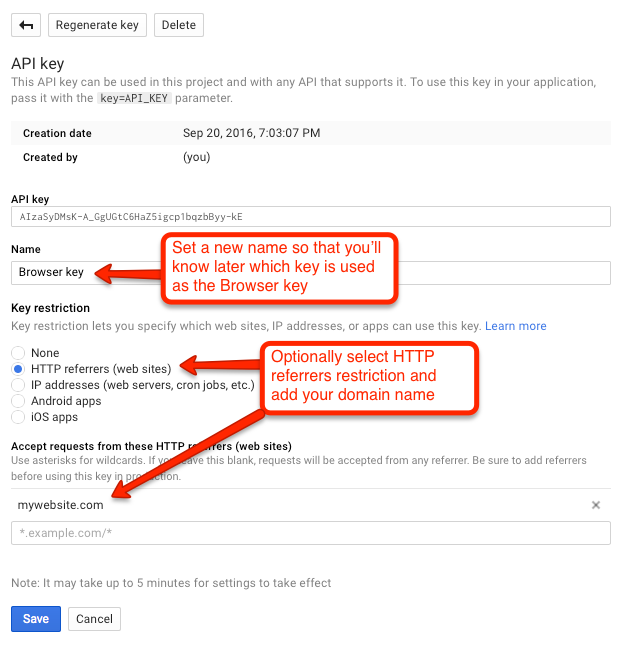
Click the Create Credentials button and in the dropdown choose API Key. You will get a new key in a popup. Click the Close button then click on the key to edit its name and optionally restrict it:
Even though Google suggest using *.example.com/* format, it is better to only enter the domain name. The Browser key is used on the frontend of your site to display the maps. If you have any problems, try using the key without restriction and after you confirm that the maps work, add the domain restriction.
Enabling the APIs
To use all available features of the GeoMaps add-on, you will need to enable these APIs:
- Google Maps JavaScript API
- Google Static Maps API
- Google Maps Geocoding API
- Google Maps Geolocation API
- Google Places API
- Google Maps Directions API
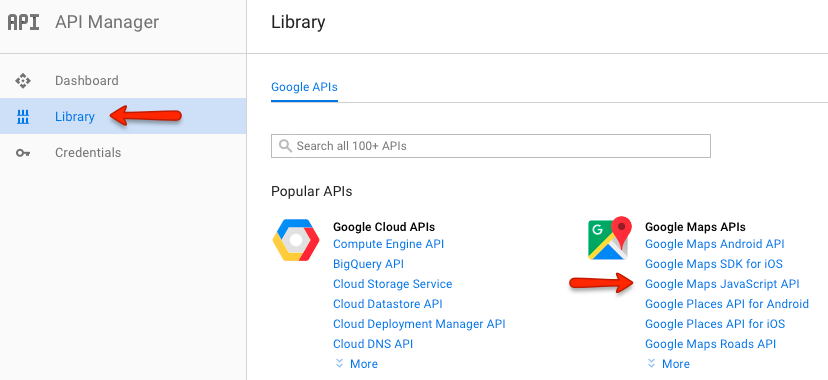
Click the Library link in the sidebar and click on one of the APIs:
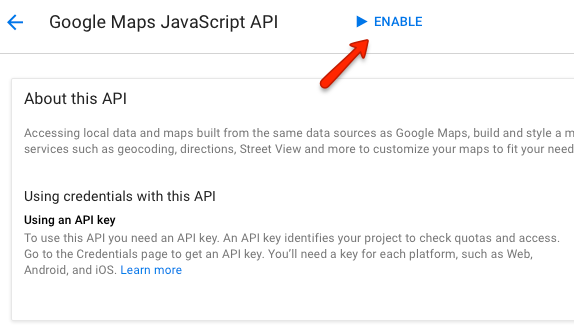
On the next screen, click the Enable button:
Go back to the Library and repeat the same steps to enable the other required APIs.
Adding API Keys to the GeoMaps add-on configuration
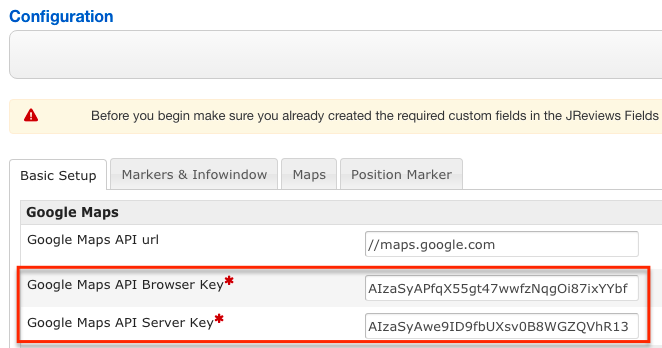
For the GeoMaps add-on to use the APIs, enter the API keys you created into the GeoMaps Configuration:
Save the configuration and click the Clear Cache & File Registry link in JReviews sidebar. The maps should now work on the frontend of the site if you fully configured the GeoMaps add-on.
Creating a billing account for your API project
In July of 2018 Google changed the pricing model for it's Google Maps service. This means that unless you create a billing account and associate it with your Google Cloud Console project, maps, and all other GeoMaps related features that depend on Google API services (geolocation, directions, and streetview) will stop working.
Google is giving you a $200 credit per month. After that they will charge incrementally based on their new pricing structure. You can also set a maximum daily spend limit.
What do you need to do?
- Go to the Google Cloud Console Billing page and create a new billing account for your project if you don't already have one.
- Go to the Google Cloud Console Dashboard and select the project you use with your JReviews site from the top bar. Make sure this project has all the necessary APIs enabled for GeoMaps
- Once inside your project, click the hamburger menu icon on the top-left and select Billing to associate your project with the billing account you created in step 1.
- Check your email to find a verification/confirmation email from Google to finalize the process.
You may need to wait a few minutes for the changes to go live.
In an effort to help you offset the potential costs associated with Google's pricing change, a new feature was developed for GeoMaps to disable the rendering of maps until a button is clicked by the site visitor. You can read more about it in the announcement post in the forum. For clients with very high usage, a brand new MapsPro Add-on was also developed which allows you to choose from several free and paid maps and geocoding providers. To purchase MapsPro you need to be on the Standard, Professional or Developer plans.
