Difference between revisions of "How to change the rating star images"
| Line 12: | Line 12: | ||
If you prefer to use a custom image for rating stars, you'd need to create 2 image files, one with 16x16 icon grid and one with 24x24 icon grid. Use existing rating_stars.png and rating_stars_lg,png images as a "template" for your custom images. | If you prefer to use a custom image for rating stars, you'd need to create 2 image files, one with 16x16 icon grid and one with 24x24 icon grid. Use existing rating_stars.png and rating_stars_lg,png images as a "template" for your custom images. | ||
| − | Place the image | + | Place the image into the /theme_css/images folder of your custom theme in overrides and add this code to your custom_styles.css file: |
| + | <source lang="css"> | ||
| + | .jrRatingStarsUser, | ||
| + | .jrRatingStarsEditor, | ||
| + | .jrRatingStarsUser div, | ||
| + | .jrRatingStarsEditor div { | ||
| + | background-image: url(images/rating_stars.png); | ||
| + | } | ||
| + | .jrRatingsLarge .jrRatingStarsUser, | ||
| + | .jrRatingsLarge .jrRatingStarsEditor, | ||
| + | .jrRatingsLarge .jrRatingStarsUser div, | ||
| + | .jrRatingsLarge .jrRatingStarsEditor div { | ||
| + | background-image: url(images/rating_stars_lg.png); | ||
| + | } | ||
| + | |||
| + | /* rating form */ | ||
| + | .ui-stars-star a { | ||
| + | background-image: url(images/rating_stars_lg.png); | ||
| + | } | ||
| + | </source> | ||
| Line 28: | Line 47: | ||
<source lang="css"> | <source lang="css"> | ||
| − | |||
.jrRatingStarsUser, | .jrRatingStarsUser, | ||
.jrRatingStarsEditor, | .jrRatingStarsEditor, | ||
Revision as of 15:26, 5 December 2016
Changing the stars in JReviews v2.7.14.1 and newer
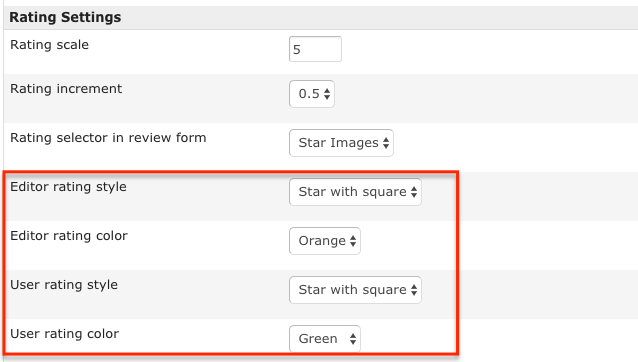
Starting with JReviews v2.7.14.1 release, it is possible to change the style and color of ratings for both editor and user reviews:
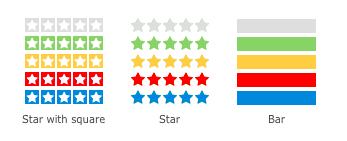
These styles and colors are available:
If you prefer to use a custom image for rating stars, you'd need to create 2 image files, one with 16x16 icon grid and one with 24x24 icon grid. Use existing rating_stars.png and rating_stars_lg,png images as a "template" for your custom images.
Place the image into the /theme_css/images folder of your custom theme in overrides and add this code to your custom_styles.css file:
.jrRatingStarsUser,
.jrRatingStarsEditor,
.jrRatingStarsUser div,
.jrRatingStarsEditor div {
    background-image: url(images/rating_stars.png);
}

.jrRatingsLarge .jrRatingStarsUser,
.jrRatingsLarge .jrRatingStarsEditor,
.jrRatingsLarge .jrRatingStarsUser div,
.jrRatingsLarge .jrRatingStarsEditor div {
  background-image: url(images/rating_stars_lg.png);
}

/* rating form */
.ui-stars-star a {
  background-image: url(images/rating_stars_lg.png);
}
Changing the stars in JReviews v2.7.13.1 and older
If you want to change the rating stars, you only need to define a different stars background image. There are several sprite images for rating stars available in JReviews themes:
To change which image file is used for rating stars, use this custom css and adjust the file name:
.jrRatingStarsUser,
.jrRatingStarsEditor,
.jrRatingStarsUser div,
.jrRatingStarsEditor div {
    background-image: url(images/rating_bars.png);
}

/* rating form */
.ui-stars-star a {
    background-image: url(images/rating_bars.png);
}
If you want to use your own stars image, place the image file into \theme_css\images\ folder in your theme.
Make sure your custom stars have the same dimensions, otherwise you will need to modify styles for dimensions also.


