Difference between revisions of "FormBuilder Custom Field"
(→Defining a form via JSON Schema) |
|||
| Line 10: | Line 10: | ||
* '''Customizable output''': Flexible data entry is not complete without flexible output, so each FormBuilder field has its own custom theme allowing you to build the layout you want. The themes can be built using the PHP editor inside the field settings, or using a separate theme file. | * '''Customizable output''': Flexible data entry is not complete without flexible output, so each FormBuilder field has its own custom theme allowing you to build the layout you want. The themes can be built using the PHP editor inside the field settings, or using a separate theme file. | ||
| + | |||
| + | == Playground!! == | ||
| + | |||
| + | What better way to learn than with an active demo? We've put together a playground page where you can see some of the example forms in action and even modify them or build your own. We've also added some "How to" examples for working with Lists and Arrays. | ||
| + | |||
| + | [https://docs.jreviews.com/playground/formbuilder/ Take me to the Playground] | ||
== Support for new forms & themes == | == Support for new forms & themes == | ||
Revision as of 19:55, 27 June 2016
Contents
Introduction & Features
The FormBuilder Custom Field allows you to create an entire form within a custom field using a JSON Schema to define the form. This self-contained form has the following capabilities:
- Repeatable inputs: Inside the FormBuilder custom field, any input or group of inputs can be setup so that with the click of a button a new copy is made in the form. Not only that, but groups of inputs inside another group can also be repeated which adds endless possibilties. For example, with a restaurant menu it's possible to setup a form with a main section and dishes inside. The main section can be repeated, and also the dishes within each section.
- Quick re-ordering: Whenever an input or group of inputs is repeated, you will see up/down arrows appear next to each copy. I am sure you've been through this before. You start adding a bunch of data only to realize you missed something and don't want to start over. This feature conviniently prevents this painful situation.
- Customizable output: Flexible data entry is not complete without flexible output, so each FormBuilder field has its own custom theme allowing you to build the layout you want. The themes can be built using the PHP editor inside the field settings, or using a separate theme file.
Playground!!
What better way to learn than with an active demo? We've put together a playground page where you can see some of the example forms in action and even modify them or build your own. We've also added some "How to" examples for working with Lists and Arrays.
Support for new forms & themes
Creating new forms and writing custom themes could become a very time-consuming process depending on the complexity of the form and theme. We've put together several examples so you can use them as starting points to build your own forms and themes. We understand that there will be a lot of interest in creating new forms and custom themes and while we may be able to help in some cases and use the experience to keep improving this article, we want to be upfront about that fact that we won't be able to create new forms and themes for everyone as part of the support for JReviews.
Using the pre-defined forms
To help you quickly get started with using the FormBuilder field, we've put together several examples. Each one has it's own custom theme to render the form output.
- Business Hours (array)
- Restaurant Menu (nested arrays)
- Recipe (multiple arrays at the same level)
- Inventory (array)
- Computer Specifications (array)
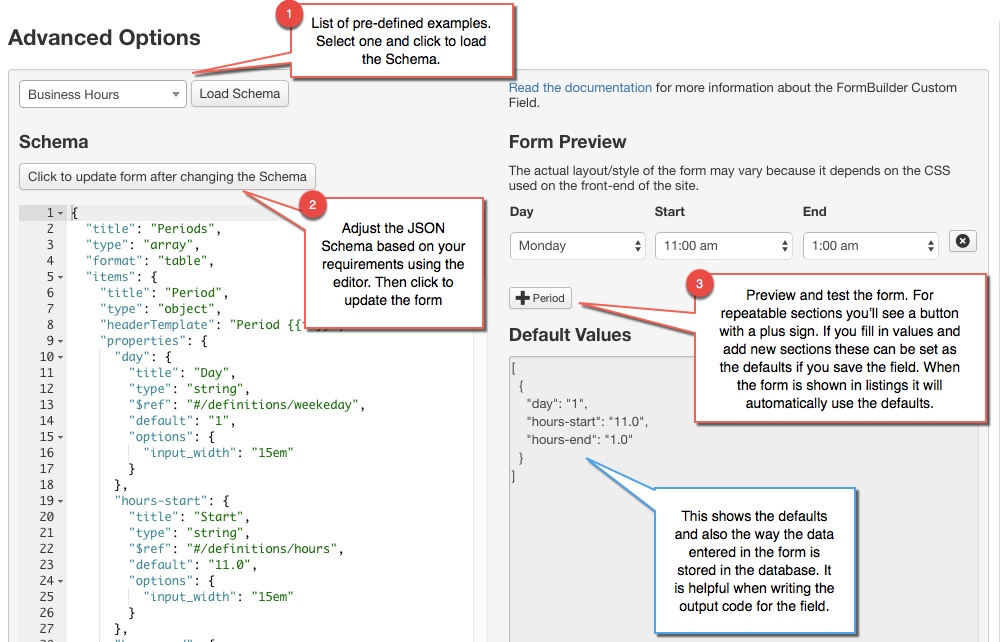
Create a new custom field and select the FormBuilder type. In the Advanced Options panel, you'll see a list of Schemas appear. Select one, click Load Schema and save the field. Each of the examples has it's own theme file, and the theme name is automatically pre-filled in the PHP Based Formatting input below the Schema editor.
Defining a form via JSON Schema
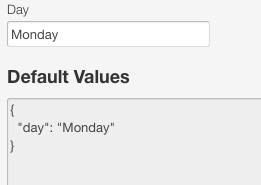
Let's consider the Business Hours example. First, we need to define a Period section which includes day of the week, start and end hours. To simplify, let's start with just the day of the week.
{ "title": "Period", "type": "object", "properties": { "day": { "title": "Day", "type": "string", "options": { "input_width": "15em" } } } } |

|
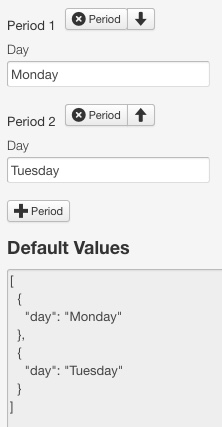
That was easy. But, we want a section that contains the input that can be repeated. A repeatable section has the type array and everything we want repated needs to be nested inside this array. So we use what we already had before, and we nest it inside an array.
{ "title": "Periods", "type": "array", "items": { "title": "Period", "type": "object", "properties": { "day": { "title": "Day", "type": "string", "options": { "input_width": "15em" } } } } } |

|
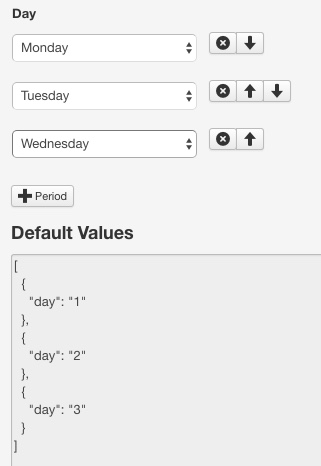
Now we have a repeatable section. You can see there's a button to add a new Period and once a Period is added there's a button to remove it. Ordering arrows also appear so you can re-order the sections as you add them. So this is all pretty cool, but we want to use a select list with pre-defined options for day of the week, and we also want a more compact output in table layout. To make these changes, we'll be using the "$ref" attribute for the day input to define the list of options and the "format" attribute to change the output of the array into a table.
So there you have it. A list of options for day of the week and a more compact output in table format. To view the complete solution for the Business Hours you can select it from the field settings and load the Schema. Make sure you check the other examples to explore all of the possibilities.
Rendering the form data using PHP or a theme file
The data gathered through the FormBuilder custom field is received and stored as a JSON object. The format is the one seen in the Default Value section in the Advanced Options panel. Without any processing you'll see the output of the field appear as a string with JSON format. It's not possible for JReviews to automatically parse and render the output for any custom form, so in order to output something nicer it is necessary to parse the output, first converting it into an array and then accessing the elements in that array. There are two options for doing this.
Using the PHP format editor inside the field settings
For simpler forms which require less processing sometimes it will be convenient to write the code directly in the theme settings. The first thing you need to do is convert the JSON object into an array that will allow you to access the data or loop through the array. There is no need to use an opening PHP tag inside the PHP editor.
$text = json_decode($text, true);
Using a theme file
The default location for the FormBuilder theme files is in the default theme inside the fields_formbuilder directory. You can create your own themes and place them in the same directory inside your custom theme in overrides. Similar to the PHP editor, then first thing you need to do is convert the output to an array.
<?php
$text = json_decode($text, true);
The advantage of using a theme file is that you can also use the JReviews helper method prx on the $text array to view a nicely formatted version of the array that you can then use to plan how you want to render the theme. So to get started we recommend you use these two lines:
<?php
$text = json_decode($text, true);
prx($text);
Make sure you check all of the existing examples when creating your own themes.

