Difference between revisions of "JReviews:Add-on Development"
| Line 237: | Line 237: | ||
</div> | </div> | ||
| − | <source> | + | </source> |
There's one final step to connect the new setting we created with the front-end of the application. We need to edit our plugin PHP file | There's one final step to connect the new setting we created with the front-end of the application. We need to edit our plugin PHP file | ||
Revision as of 20:28, 17 February 2014
Contents
Add-on development requires a basic understanding of PHP and MySQL and JReviews version 2.4.13.1 or higher.
What is an Add-on?
JReviews add-ons can extend the core functionality without the need to modify code in the JReviews core. Add-ons can have administration settings and management functionality, similar to the ones found in GeoMaps, PaidListings and the WidgetFactory. They can have their own front-end menus to create new pages on your site. They can intercept database query requests and modify or extend the results of queries and they can also modify any variable that is sent to a view before the view is rendered.
Creating an Add-on
Add-ons live in the /components/com_jreviews_addons folder and at a minimum must have an XML file and a JReviews plugin PHP file. The XML file lets JReviews identify the add-on. The JReviews plugin PHP file can run code on specific events to modify the front-end functionality. To get started we'll use a simple example that will append the category title to the listing title in detail pages.
Creating the Add-on XML file
The XML filename should match the <name> tag inside the XML file and should also match the add-on's folder name in /components/com_jreviews_addons.
<?xml version="1.0" encoding="utf-8"?>
<addon>
   <title>Title Modifier</title>
   <name>titlemodifier</name>
   <description><![CDATA[Title Modifier]]></description>
   <author>ClickFWD LLC</author>
   <url>http://www.reviewsforjoomla.com</url>
   <created>02/17/2014</created>
   <version>1.0.0.1</version>
   <copyright>Copyright (C) 2010-2014 ClickFWD LLC</copyright>
   <license>http://www.gnu.org/licenses/gpl-2.0.html GNU/GPL</license>
</addon>
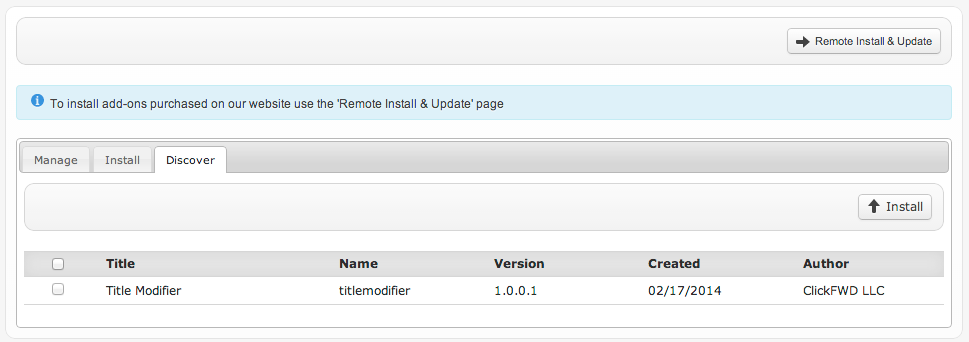
Create the folder and file /components/com_jreviews_addons/titlemodifier/titlemodifier.xml. Paste the code above and save. Then go to the JReviews Add-on Manager's Discover tab and you should find the new 'Title Modifier' add-on. Check the box for it and install it.
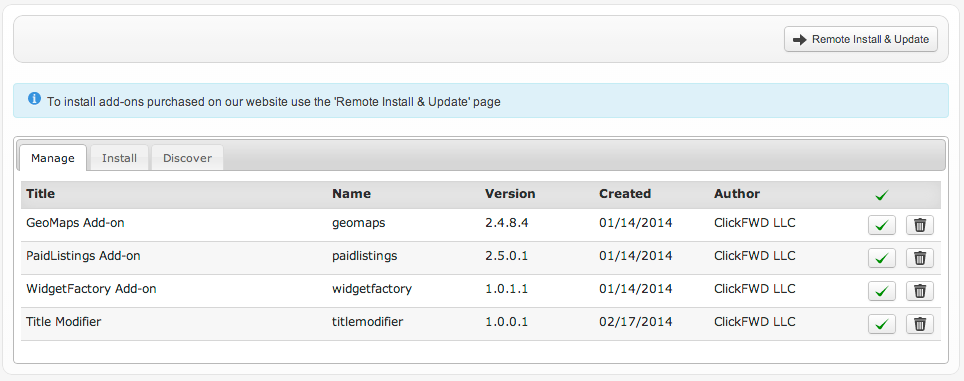
Now if you switch to the Add-on Manager's 'Manage' tab you'll find your new add-on there:
Creating the Add-on plugin PHP file
The plugin php file is where all of the magic happens for add-ons that want to modify existing functionality. The plugin file can have any name you want, but we typically use the same add-on name for the plugin filename. Create the file /components/com_jreviews_addons/titlemodifier/plugins/titlemodifier.php with the code below:
<?php
defined( 'MVC_FRAMEWORK') or die;
/**
* The class name matches the filename with the first letter capitalized
*/

class TitlemodifierComponent extends S2Component {

    var $published = false;

    function startup(&$controller)
    {
        // We only want the plugin to run in the detail page

        if($controller->name == 'com_content' && $controller->action == 'com_content_view')
        {
            // Make the controller properties available in other methods inside this class

            $this->c = &$controller;

            $this->published = true;
        }
    }

    /**
     * Event triggered before the theme is rendered
     * All variables sent to theme are available via $this->c->viewVars array
     */

    function plgBeforeRender()
    {
        $listing = & $this->c->viewVars['listing'];

        $listing['Listing']['title'] .= ' - ' . $listing['Category']['title'];
    }
}
Next clear the File Registry in the JReviews administration so it can recognize the new file. Go to a listing detail page and voilà. Congratulations! You've built your first add-on. You can disable the add-on by un-publishing it in the 'Add-on Manager'.
Limiting the scope of the add-on to specific pages or actions
It is important to make sure that your add-on code only runs in the pages or actions you want to modify. In the php code above you can find these lines:
        // We only want the plugin to run in the detail page

        if($controller->name == 'com_content' && $controller->action == 'com_content_view')
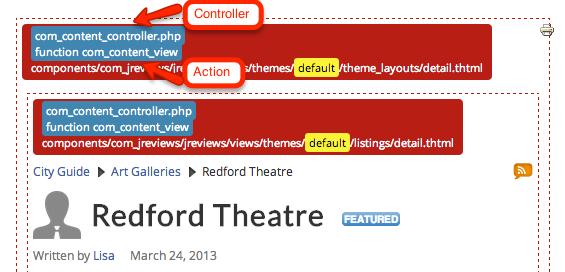
Every request to a JReviews page or action, like a listing or review submission, goes through a controller and a controller action. The controller is a PHP class and the action is a method or function within that PHP class. All controllers in JReviews and add-ons can be found inside the /controllers folder. When the JReviews detail page is called via the browser URL a request is made to com_content_controller.php, and the 'com_content_view' action (or method) inside that file.
JReviews makes it very easy for you to find out which controller and action are being called through the 'Theme Debug' setting that can be found in the Configuration, General tab. Once you enable this setting, go to a listing detail page and you'll see the name of the controller file and the action (function name) to which the request is being made.
Add-on plugin Events
Events are triggered at different points during the execution of a request. The following are the events that you can use inside the add-on php plugin file.
- plgBeforeDelete: triggered before the Model::delete method
- plgAfterDelete: triggered after the Model::delete method
- plgBeforeRender: triggered before the theme is rendered
- plgAfterFind: triggered after a Model query is run and before the Model AfterFind event
- plgAfterAfterFind: triggered after a Model query is run and after the Model AfterFind event
- plgBeforeSave: triggered before the Model data is stored to the database
- plgAfterSave: triggered after the Model data is stored to the database
These event triggers allow you to execute code at those specific events. They allow you to modify queries before they are run and the results of the queries after they are retrieved. They also allow you to override certain configuration settings and modify variables and arrays before they are sent to the view where theme files are rendered.
Add-on administration pages can be used to display configuration settings and manage other add-on tasks. An administration page requires at a minimum a menu, an administration controller and a view theme file. To continue our example, we'll create a simple configuration page for our add-on that will allow us to select the Listing Types where we want to append the Category title to the Listing title. Create the following folders and files:
Menu
/components/com_jreviews_addons/titlemodifier/views/admin/themes/default/titlemodifier/menu.thtml
Our menu will have a button to go back to the JReviews sidebar and a link to the add-on Configuration that allows us to refresh the page. In the menu.thtml you can create as many links as you want for add-on admin pages. Add each link inside a new 'li' element and in the hyperlink add the data attribute for the controller and action. Below we use 'admin_titlemodifier' for the controller and 'index' for the action.
 <div class="jrGrid">
   <button class="jr-main-menu jrButton"><span class="jrIconPrev"></span>Back to JReviews</button>

      <div class="jrCol12 jrHeader">Title Modifier Add-on</div>

<div class="jrCol12">
          <ul>
              <li>
              	<a href="javascript:void(0)" class="jr-menu" data-controller="admin_titlemodifier" data-action="index">Configuration</a>
              </li>
          </ul>
      </div>
  </div>
Controller
In the admin controller we can autoload Models, Components and View Helpers. Models allow us to run queries on specific tables and access other model methods. To include a model you first have to create it in the /models folder. Add-ons can load models from JReviews and from other add-ons. Components are reusable classes that can be loaded in any controller. View Helpers are classes with re-usable methods that can be used directly in the Views inside the theme files.
Our admin controller calls the CriteriaModel::getSelectList method to get an array of Listing Types and then sends it to the theme file.
/components/com_jreviews_addons/titlemodifier/admin_controllers/admin_titlemodifier_controller.php
<?php
defined( 'MVC_FRAMEWORK') or die;

/**
 * The class name is the CamelCased filename
*/

class TitlemodifierController extends MyController
{
   var $helpers = array('admin/admin_settings');

   var $components = array('config');

   function beforeFilter()
   {
      parent::beforeFilter();
   }

   function index()
   {
      // We use an existing method in the Criteria model to get the Listing Types

      $listingTypes = $this->Criteria->getSelectList();

      // Send the $listingTypes variable to the View

      $this->set('listingTypes',$listingTypes);

      // Render the View

      return $this->render('titlemodifier','index');
   }
}
View
The View is the theme file for our administration page. It has access to View Helper classes as well as variables set in the Controller. In our view we add a heading, the toolbar to save the settings and our Listing Type multi-select.
/components/com_jreviews_addons/titlemodifier/views/admin/themes/default/titlemodifier/index.thtml
<div class="jr-titlemodifier-admin">

    <div class="jrPageHeading">Title Modifier Add-on</div>

    <form id="jr-page-form" class="jrForm" action="index.php" method="post">

        <div class="jrPageToolbar jrRoundedPanel">

            <span id="jr-status" class="jrLeft jrStatus"></span>

            <button class="jr-save-settings jrButton jrGreen"><span class="jrIconSave"></span>Save</button>

        </div>

       <div>

           <?php
             $configArray = array(
                 /*** NEW HEADER ***/
                 'General Settings' => array(
                     array(
                         'label'=>'Listing Types',
                         'type'=>'selectmultiple',
                         'options'=>$listingTypes,
                         'name'=>'data[Config][titlemodifier-listingtypes]',
                         'help'=>'Limit title modifier to the selected listing types',
                         'attributes'=>array('jr-multiselect')
                     )
                 )
             );

             $AdminSettings->columns = array(5,8,11);

             $AdminSettings->displayTab('general',$configArray);
          ?>

        </div>

        <input type="hidden" name="data[controller]" value="admin/admin_titlemodifier" />

        <input type="hidden" name="data[action]" value="_save" />

    </form>

</div>
There's one final step to connect the new setting we created with the front-end of the application. We need to edit our plugin PHP file /components/com_jreviews_addons/titlemodifier/plugins/titlemodifier.php and change the code to read the Listing Types setting and create a conditional that compares the current listing's Listing Type ID with the ones saved in the configuration. Our 'plgBeforeRender' event method now looks like this:
    /**
     * Event triggered before the theme is rendered
     * All variables sent to theme are available via $this->c->viewVars array
     */
     function plgBeforeRender()
     {
         $listing = & $this->c->viewVars['listing'];

        // Read the configuration setting

         $listingTypes = Sanitize::getVar($this->c->Config,'titlemodifier-listingtypes');

        // Check that the current listing's listing type ID matches one of the IDs saved in the configuration

         if(in_array($listing['Criteria']['criteria_id'], $listingTypes))
         {
             $listing['Listing']['title'] .= ' - ' . $listing['Category']['title'];
         }
     }
Making your add-on translatable
Downloadable examples
Date-To-Age Add-on
Downoad Link
The add-on allows you to dynamically calculate and store the age of a person from his birthdate so site visitors can perform searches using the age.
Events used
- plgBeforeSave: The add-on intercepts the submitted form data to retrieve the date from the birthdate custom field. Calculate the age and then add inject the calculated value to the form data so it will be stored with the rest of the fields.
Administration The add-on has an administration page so it can be configured. You can enter the name of date listing and review custom fields as well as the name of the target listing and review field where the age will be stored. If you just want it to work for listings then you only fill out the values for listings and vice-versa. You can also use it for both listings and reviews.
It also has a second placeholder admin page for illustration purposes and without functionality.
Front-end menus The add-on has two different menu types for illustration purposes and without functionality. You can create the add-on menus via the Joomla menu manager where you'll find them under 'JReviews'. Each menu makes a request to a different controller and action and renders a different view (theme file).
Localization The add-on has an english translation where the different language strings can be found. Other locale folders can be created to translate it into more languages.


