How to set up JReviews with Amazon S3 and CloudFront CDN
In this tutorial we will show you how to integrate JReviews with Amazon S3 and the CloudFront CDN. One of the new features is integrated remote storage using Amazon S3. Users can now upload media to S3 buckets and store all of the heavy images, files and videos there. This article shows the steps necessary to create an optimized integration between JReviews, S3 and CloudFront.
Contents
- 1 Set up your Amazon S3 Bucket
- 2 Serving Amazon S3 files through a CDN
- 3 Create a CloudFront distribution for your S3 bucket
- 4 Assign a CNAME to your CloudFront distribution
- 5 Alternative CDNs
- 6 Already have buckets with media? Or did you start with local JReviews media and now want to use S3?
- 7 A few words about S3 metadata
Set up your Amazon S3 Bucket
If you do not already have an account with Amazon Web Services you can create one here.
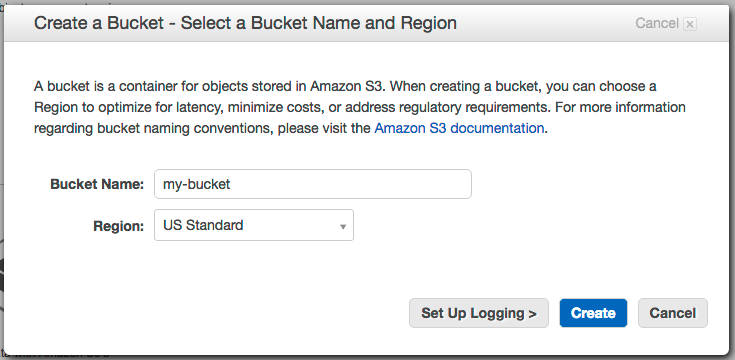
Log in to your AWS account and go to the AWS Management Console and click on the S3 icon. Click on "Create Bucket" and in the screen that pops up we will enter a bucket name and select a region.
Your bucket name should be a single word or use a hyphenated format like bucket-name. This is to be able to accommodate both a content delivery network (optional) like Amazon CloudFront as well as allowing access to the bucket over secure and non-secure connections. Note that bucket names with dots in them (like my-bucket.domain.com) will not be able to be properly accessed over SSL. If you already have a bucket loaded with media or you make a mistake entering the bucket name don't worry. Below we will show you how to change the name of an S3 bucket. As for the region, the cheapest storage is US Standard. If you need your files to be served from another region you can either select the closest datacenter now or, better yet, use a content delivery network to deliver your S3 content. We will explain how to set up the CDN below.
After creating a bucket you are all set. Now grab your access keys by clicking on the Security Credentials link under your name in the upper-right part of your screen.
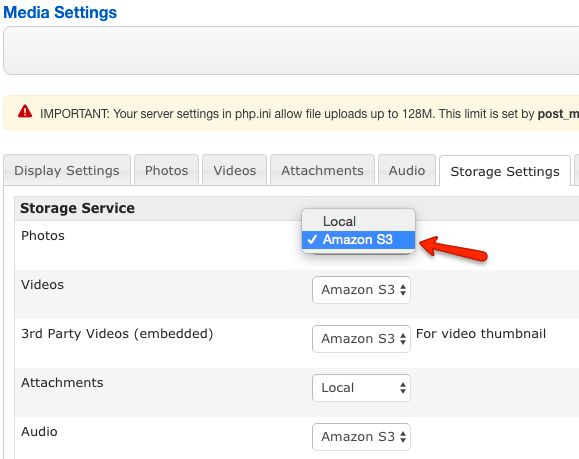
Now that your Amazon S3 account is set up, log in to the administration of your website and go to the JReviews component. In the left sidebar click on "Media Settings" under the CONFIGURATION menu. Under the "Storage Settings" tab you need to fill in some information.
In the Storage Service section we have the option of choosing where we want to host our media: on the local server or, in this case, Amazon S3. So the storage service we choose for photos will be Amazon S3.
Don't forget that videos and audio can only be stored on S3. Local storage on your server for these media types is not an option.
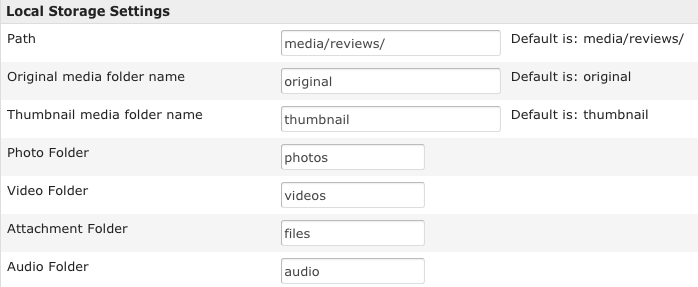
The next section is Local Storage Settings. Here you can change the relative paths to the media files to better match your site's content or to accommodate for foreign language sites. For example, you may prefer in the URL "photographs" to "photos" for your image media. Keep in mind that although this section refers to local storage, the relative paths here will also be used on S3 so if you don't like the default folder names change them now.
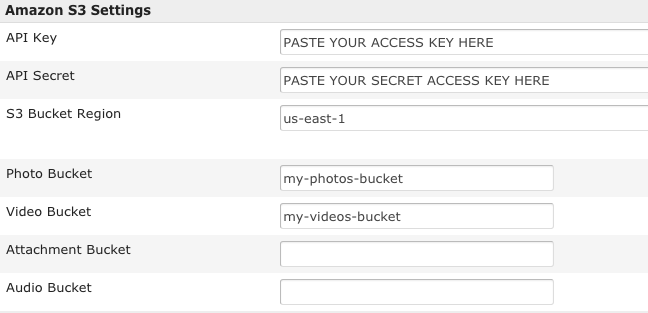
The final step in JReviews administration is to paste your AWS keys into the corresponding fields. Your media will not be able to be uploaded to S3 without adding your keys in this step. You probably still have your credentials open in one of your browser's tabs, so just copy and paste the two keys as shown in the following illustration. You need to enter the name of your photo bucket that we set up at the beginning of this tutorial. Also enter the S3 Bucket Region code based on what you chose when creating the buckets. See the complete list of available regions.
Leave the Amazon CloudFront CDN setting alone for now. Click the Save button at the top and that's it! You are now ready to upload photos using JReviews' media upload capabilities and they will be stored in your Amazon S3 photo bucket! Your users can also use this wonderful feature. Site visitors can upload media when adding a new listing or leaving a review and it all goes to your S3 bucket(s). Go ahead and set up a video, attachment and audio bucket if you need them.
Serving Amazon S3 files through a CDN
If you followed the steps above you now have a working integration between JReviews and Amazon S3. Your files are stored in S3 and when a user hits your site, JReviews media is served from the corresponding S3 bucket. This speeds up load times by offloading images and other media, which tend to be heavy files, to another server. Nevertheless, the media is stored and served from the region you selected when you created your bucket. Furthermore, Amazon S3 is primarily a remote storage service. It is not the ideal place from which to be serving content for a busy website. Hundreds or thousands of pageviews per day can drive up your S3 costs over time. Don't worry, AWS has a solution for this: CloudFront.
Amazon CloudFront is a content delivery network. It caches your website's files in various locations around the globe. When your site receives a visitor, CloudFront delivers the content from the nearest possible location. Additionally, the CloudFront distribution can be set to store your S3 files in its cache for a long period of time. This way, when a visitor hits your site, the JReviews media is being served from the CDN cache. CloudFront only accesses your S3 buckets when its cache expires. Setting up your JReviews site with Amazon S3 and CloudFront integration is the best possible combination: JReviews for features, S3 for storage and a CDN for media delivery. CloudFront is much more cost-effective than S3 for serving content. Enough talk; let's set it up!
Create a CloudFront distribution for your S3 bucket
Back in your AWS account, under the "Services" menu find the CloudFront link and click it. Next, click the "Create Distribution" button. Select "Download" as your delivery method and click the "Continue" button. Click the empty field "Origin Domain Name" and select your bucket from the drop-down list that appears. The Origin ID is generated by Amazon and we leave "Restrict Bucket Access" to No. This section should look like this:
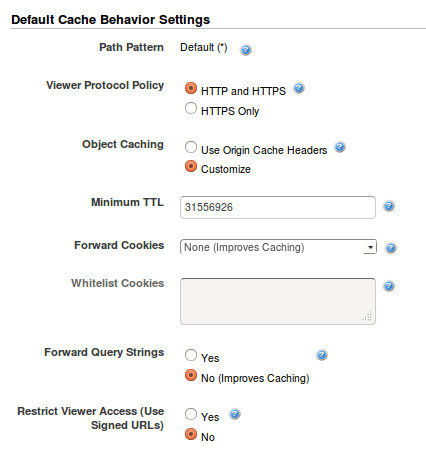
Now on to Default Cache Behavior Settings. The only change we need to make here is to set "Object Caching" to "Customize" and enter a value of 31556926 for "Minimum TTL". What we are doing here is telling the CDN to store the S3 media in its cache for one year, or 31556926 seconds. You could even make this ten years if you want. The way that JReviews dynamically creates media file names and re-sizes images and thumbnails according to your setting in administration means that you will never have to worry about an old cached file being delivered to your users. Any change made to JReviews media results in new files and filenames generated on the fly. This section of your distribution should look like this:
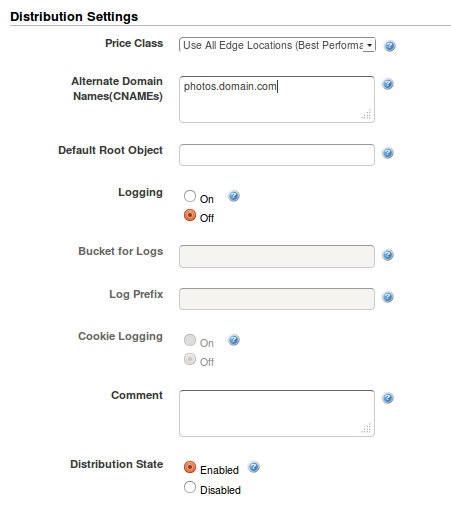
Finally, in the last section of the distro creation "Distribution Settings", you MUST enter in "Alternate Domain Names (CNAMEs)" the exact name of your desired masked domain name. A CNAME is an alternative DNS that you can use to mask the CloudFront URLs on your website. Using our photo bucket example, you should enter photos.domain.com as the CNAME.
Your Distribution Setting should look like this:
You can now click on the "Create Distribution" button. You will be taken back to the CloudFront distributions page and your new CDN will appear with some spinning stars while Amazon gets your S3 bucket media and distributes it throughout its network. This process normally takes about fifteen minutes. While you are waiting, highlight the Domain Name with your mouse and copy it. It should be something like wxyz1234.cloudfront.net.
Assign a CNAME to your CloudFront distribution
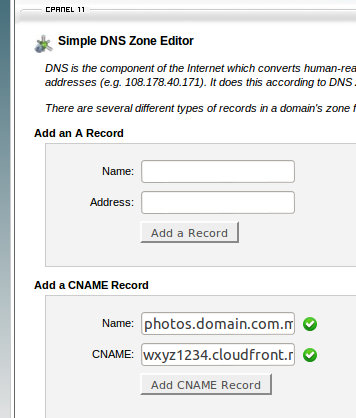
The official domain name for your bucket's CDN is now something like wxyz1234.cloudfront.net. This URL is a bit ugly, but can be re-written by editing the DNS of your domain. This is done quite easily in CPanel. Log in to your CPanel, scroll down to "Domains" and click on "Simple DNS Zone Editor". You need to add a CNAME record whose name is identical to the CNAME declared in the CloudFront distribution. In our photo bucket example the Name would be photos.domain.com. In the CNAME field you must paste in the Amazon CloudFront domain name that is something like wxyz1234.cloudfront.net. Here is what it should look like:
Click on the "Add CNAME Record" button and the new CNAME should show up at the bottom of the screen under "User-Defined Records". What we have done here will convert all requests for wxyz1234.cloudfront.net into a much nicer-looking URL like photos.domain.com. Go back to your AWS account and check if the spinning stars are still there. Once the distribution is deployed, your media will be served from the CDN instead of your S3 bucket.
If your host does not provide CPanel for your account, the process for other hosting control panels is quite similar. If you can't find where to edit the DNS records do a web search with the keywords "your-control-panel cname".
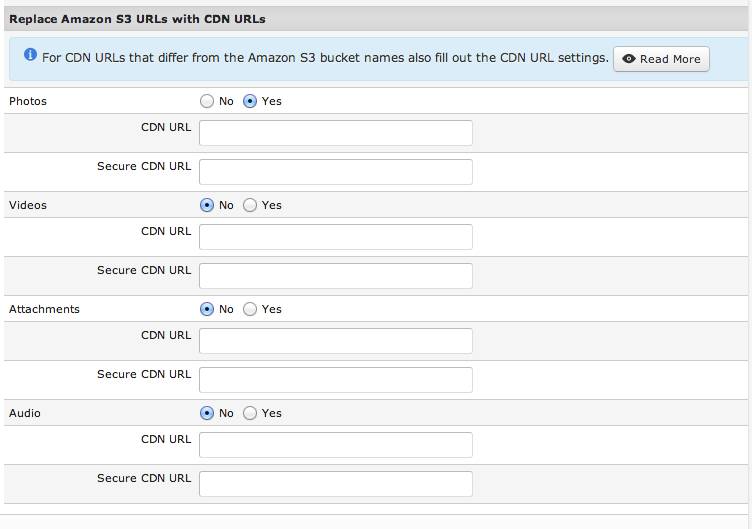
Once you have added the CNAME record and your distribution is complete, the last step is to go back into JReviews admin and activate the CDN for the chosen bucket, in this case photos:
JReviews has two fields for the CDNs: secure and non-secure. You must paste the complete domain names including the http protocol. So you will have something like these two domain names for non-secure and secure:
https://12345abcde.cloudfront.net
We must use the CloudFront domain with SSL connections because the https protocol cannot be used with CNAMEs, unless you pay Amazon $600 per month to add your own SSL certificate to your AWS account.
Alternative CDNs
If you don't want to use Amazon's CloudFront CDN, you can try KeyCDN instead, here are the instruction on how to use KeyCDN with Amazon S3.
Already have buckets with media? Or did you start with local JReviews media and now want to use S3?
So you installed or upgraded to JReviews 2.4 weeks or months ago, chose a bucket name like mycoolpics.domain.com and uploaded 1,000 images to it? And now you want to allow access to the images with https S3 URLs? No problem. While AWS does not allow you to change a bucket name, they do allow you to create a new bucket and copy or upload entire folders to it. Since JReviews generates URLs that point to the bucket contents that are relative to the bucket name, all you have to do is create a new bucket mycoolpics and copy your old bucket contents to the new one.
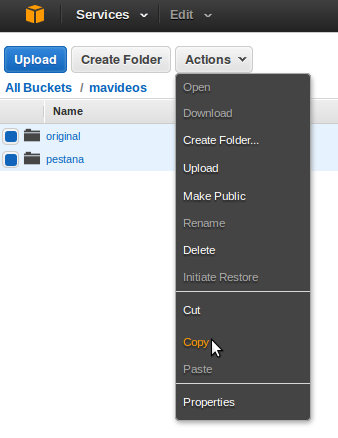
Click on the bucket you want to copy in your S3 account. Select the two folders and click on "Copy" under the "Actions" menu:
Now click on "All Buckets" and then click on your new, empty bucket. Now select "Paste". S3 will begin the transfer process. Your original bucket will remain intact. When the transfer is complete, go back in to JReviews admin and change the bucket name to the new one. Now you have a newly named bucket with the same contents as the original. Since JReviews uses the same relative file path there will be no problem fetching the media from your new bucket as long as you have entered the correct bucket name in administration.
Uploading media files from a local PC to Amazon S3
There are two ways to transfer media files:
a) Using SSH and AWS CLI Command Line
b) Using FTP or other file managers:
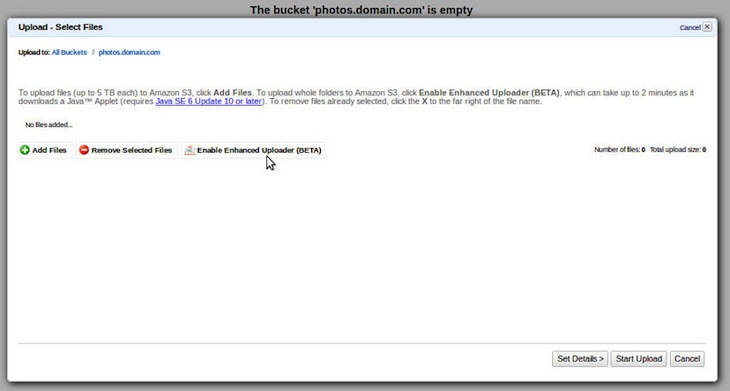
If you have been using local storage and want to start using S3 you need to download your media folders from your website to your computer using FTP or another file manager. The default path to your image media is /media/reviews/photos. In the folder you will see the two folders you need to download: original and thumbnails. You also need to have S3 and JReviews set up as explained earlier in this tutorial. Once you have the files on your computer, go to the S3 control panel and click on the bucket you want to upload to. Under the "Actions" menu click on "Upload". You will now see the file upload popup. First click on "Enable Enhanced Uploader". This is the feature that allows uploading of entire folders as opposed to single files:
Once the applet starts you can click on "Add Files". Select the two folders (original and thumbnails) on your computer. You should now see this:
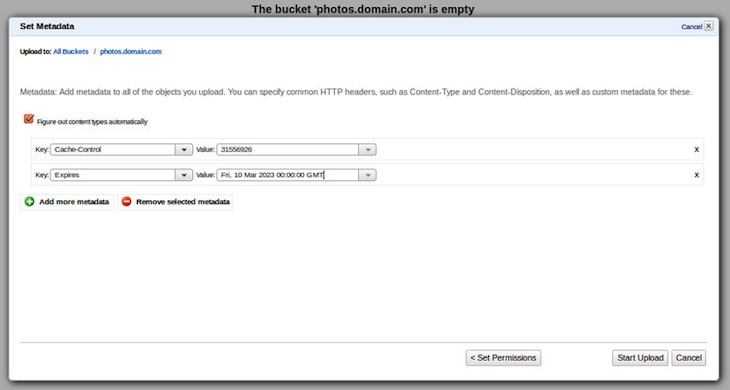
Before uploading the folders you should take a moment to add cache control and expires metadata to your files. This is important for increasing the performance of your site and reducing the number of times your S3 bucket needs to be accessed and also gives a big boost in Page Speed. Click on Set Details -> Set Permissions -> Set Metadata. Here we are going to add the two metadata items so that they are assigned to all of the files you are about to upload. We used cache control as one year (31556926 seconds) and expires as a date roughly ten years from the time we wrote this. One year for the expires setting is more than enough so a random date in the future can be chosen. Just make sure it's not less than a year and that you have the matching day, date and year.
When you are finished click on "Start Upload".
Once the upload is complete you will now have a bucket that is a mirror image of the media on your JReviews site. To instruct JReviews to begin using Amazon S3 go into admin and change the Storage Service for photos from "Local" to "Amazon S3" and click the "Save" button. Your JReviews site is now integrated with S3! Repeat the process for other media types (videos, attachments and/or audio) you would like to move to S3.
With large buckets your AWS session might time out by doing batch jobs. You can use BucketExplorer to overcome this issue, or create a bucket policy to quickly make all your files public. Paste this code into the bucket policy replacing my-bucket with your bucket name:
{
     "Version": "2008-10-17",
     "Statement": [
          {
               "Sid": "AllowPublicRead",
               "Effect": "Allow",
               "Principal": {
                    "AWS": "*"
			},
               "Action": "s3:GetObject",
               "Resource": "arn:aws:s3:::my-bucket/*"
          }
     ]
}
A few words about S3 metadata
JReviews assigns cache-control of one year and expires metadata of one year to the files that are uploaded to S3. This provides an important boost in page speed by reducing http requests to your buckets. This feature was introduced in March 2013 with JReviews 2.4.6.1. If your S3 bucket has older files you should use a tool like Bucket Explorer to add metadata in bulk to your buckets.
Bucket Explorer is also useful for managing your S3 buckets and it also allows you to batch download entire buckets, useful for keeping local backups.
Written by Steve Koontz. http://pueloconsulting.com/blog/33-jreviews-with-amazon-s3-and-cloudfront-cdn
